Enable Iridium Communication on an X-Series Data Logger
Satellite/Iridium transmission is more expensive than other traditional forms of communication (e.g., cellular, radio, Wi-Fi). Therefore, it is imperative that the end-user only transmit the most useful diagnostic and sensor parameters. The CONNECT software can set these parameters and their log/transmission interval before the data logger transfers data to the web. Thus, outlining the proper sensor configuration through the CONNECT software will reduce overall data transfer.
If a sensor detection has not been performed, follow the included quick start guide to complete the detection process. It is recommended to disconnect the iridium antenna before performing the detection to ensure no communication is established with WQData LIVE. It is imperative that all internal logger settings are finalized before allowing the logger to send data to WQData LIVE.
1) Setup an Iridium Short-Bust Data (SBD) Account
All Iridium-enabled X-Series data loggers must have an active SBD account in order to send measurement data to WQData LIVE. If iridium service is not purchased through NexSens, follow the link below to find a 3rd party iridium service provider and set up an SBD account:
2) Setup a Gmail Account for Iridium Messages
X-Series loggers with Iridium telemetry transmit data messages to a dedicated email server. The messages are then downloaded from the email server to the WQData LIVE web datacenter. NexSens hosts a secure Gmail account as a medium to store and upload data to WQData LIVE. Although this option is freely available to all customers who purchase an Iridium system, private Gmail accounts can be set up to achieve the same purpose. Follow the link below to set up a user-owned Gmail account to send Iridium data messages to WQData LIVE.
3) Set Transmit Flags
Transmit flags control which parameter data is transmitted to WQData LIVE. Setting the transmit flags allows the user to control the amount of data that is transmitted to the web at each interval. It is important to review the iridium plan purchased through NexSens or a 3rd party provider to ensure the data size does not exceed the allowable limit.
- Follow the link below to set the appropriate transmit flags for the logger.
- Set Transmit Flags and Start Time/Interval
- It is advised to enable transmit flags for the following internal X2 parameters:
- Primary Power
- Internal Humidity
- Cell Signal Strength
- Cell Status
- It is advised to enable transmit flags for the following internal X2 parameters:
- Set Transmit Flags and Start Time/Interval
4) Set Log/Selective Upload Interval(s)
The log interval controls the frequency at which parameter data is recorded, and the selective upload interval controls the frequency at which parameter data is transmitted. Users may set parameter data to log internally at a higher frequency while only transmitting a portion of the logged data. The selective upload feature allows iridium users to limit their overall transmission size while still collecting data at a higher resolution. The logged data can then be downloaded directly at a later date.
- Follow the link below to set the appropriate log and selective upload intervals based on the iridium data plan and the data collection requirements.
- Set Log and Selective Upload Intervals
- It is advised to set the selective upload interval for the internal X2 parameters to at least 6 hours; however, this will depend on the Iridium plan purchased for the logger.
- Set Log and Selective Upload Intervals
5) Review & Begin WQData LIVE Setup
Review the final sensor configuration and gather multiple readings before continuing with the WQData LIVE setup. The Gmail account associated with the Iridium service must be entered into the advanced WQData LIVE settings for the data logger. These settings create the connection required for WQData LIVE to extract the Iridium messages. Follow the link below to set the appropriate settings on WQData LIVE:
- Configure an Iridium Logger on WQData LIVE
- At the next transmit interval, the logger will push its sensor configuration to the email assigned to it during the Iridium account setup.
- WQData LIVE will request messages from that email every 5 minutes. Once the emails are extracted, it will take ~2 additional minutes for processing before the configuration is visible on the web.
6) Update Logger’s Binary Format
- Once the configuration is visible, the user must send the “Update Binary Format” command from WQData LIVE.
- The binary format command will provide the settings outlined in the CONNECT software.
- Note: No data will transfer until the data logger provides an updated binary format to the web.
- Navigate to the ADMIN | Settings tab at the top of the WQData LIVE Project Dashboard.

Figure 1: ADMIN | Settings tab.
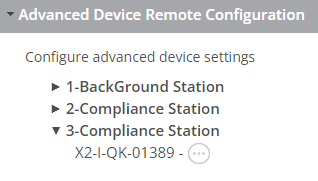
- Click on the Advanced Device Remote Configuration drop-down menu and choose the logger.
- Enter code ‘nexsens’ when prompted.

Figure 2: Advanced Device Remote Configuration drop-down menu.
- Click the UPDATE button underneath Update Binary Format.
- A prompt should display showing the command was sent successfully.
- After the command is sent, three full transmission intervals will occur before data is pushed to the web.
- The logger will pull this remote command from the email at the first transmit interval.
- The logger will provide the updated format at the second transmit interval.
- WQData LIVE will process this format and be able to parse the data that is pushed on the third transmit interval.
