
Set Transmit Flags and Start Time/Interval
Transmit flags control whether or not a parameter is transmitted to WQData LIVE. Transmit flags are set to enabled or disabled for all X2 diagnostic and detected sensor parameters through CONNECT software. This feature helps reduce the overall size of a data transmission, limiting it to only the necessary diagnostic or sensor parameters. Conveniently, the X2 will still log all data internally, allowing for direct data upload of these additional parameters later.
Additionally, the transmit start time and the transmit interval are configurable through CONNECT. Setting the transmit interval to a later date provides time for sensor deployment and stabilization before pushing up accurate data to the web.
This feature is particularly useful in Iridium data systems where data transmission is very expensive. In many such cases, only periodic data is necessary in real-time to ensure the system is still operational.
Adjust Parameter Transmit Flags
To set transmit flags:
- Connect the X2 logger to a PC and launch the CONNECT software. Test connection by reading the RTC clock of the logger in the CONFIG tab.
- From the CONNECT main window, select the TRANSMIT tab.

Figure 1: TRANSMIT tab in CONNECT.
- Select Read X2 Tx flag from the Transmit Flag drop down list to view the current parameter transmit flags.
Figure 2: Read current X2 transmit flags.
- Disable parameters from transmitting by removing the check mark next to the parameter name and then clicking Write Tx flag to X2.
- For Iridium systems, it is recommended to disable all other diagnostic parameters besides primary power and internal humidity.
- For all other parameters, it is best to review the Iridium data plan to determine the desired parameters that will be transmitted to WQData LIVE.
Figure 3: Write X2 transmit flags.
- If changes to the transmit start time or interval are not necessary, then skip to the final section WQData Setup.
Set Start Time and Transmit Interval
- Select the Start time/ Interval (sec) drop down list. Then, choose the Read X2 Tx start time and interval to get the current start time and transmit interval.
|
Figure 4: Current X2 transmit start time (MM/DD/YY hh:mm:ss) and interval (sec). |
Figure 5: X2 start time (top red outline) and transmit interval (bottom). |
- Adjust the start time by either entering the date and time manually using the MM/DD/YY hh:mm:ss format or by clicking on the calendar icon and choosing a date.
- Note: The earliest start time is the default start time of 12/31/1969 19:00:00. Leaving the default setting is equivalent to “start now”.
- Example below (Figure 6): Logger set to start recording on July 15th, 2021 at 19:00:00.
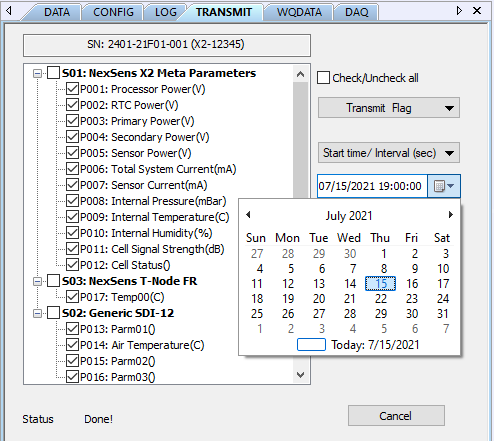
Figure 6: Change the transmit start time.
- Change the transmit interval by manually entering the new transmit interval in seconds.
- In the following example (Figure 7), the new transmit interval setting is every 3600 seconds (1 hour).
Figure 7: New transmit interval set to one hour or 3600 seconds.
- Once adjusting all transmit interval settings, select the Start time/ Interval (sec) drop down list. Then, choose Write Tx start time and interval to X2.
Figure 8: Write the start time and transmit interval to the X2.
WQData Setup
Once adjusting the transmit settings, reference the following article to push the new configuration to WQData LIVE.
Communicate with WQData LIVE through CONNECT