
Gill MaxiMet Weather Station X2 Integration Guide (SDI-12)
Real-Time Weather Measurements
The Gill MaxiMet GMX-Series Weather Stations measure a host of atmospheric and environmental parameters. The sensors are compatible with NexSens X-Series data loggers via the SDI-12 communication protocol and sensor interface. A user-generated or pre-defined script on NexSens X-Series data loggers can detect, log, and transmit all parameters output by the weather station. Parameter data is transmitted, in real-time, at a user-specified interval (e.g., 10 minutes) to the NexSens WQData LIVE Web Datacenter. There, data is stored on customizable dashboards with statistics and graphical interfaces for each parameter. Users can download and send data reports via Email, FTP, or an API. Below is information on the settings and wiring required to integrate these sensors with a NexSens X-Series data logger.

Figure 1: MaxiMet GMX600 Weather Station integration with NexSens X-Series data loggers.
Gill GMX-Series Integration
The Gill MaxiMet Weather Station measures a variety of environmental parameters, including air temperature, humidity, pressure, precipitation, wind, and GPS location. All Gill MaxiMet models are compatible via the SDI-12 communication protocol and sensor interface.
1. Sensor Settings
The weather station must be set to SDI-12 output to communicate properly with the NexSens logger.
- Download the MetSet software from the Gill Instruments website and connect to the weather station using a USB configuration cable.
- Open the MetSet software and click Connect and Read.
- The software will begin searching for a connection to the weather station. Once connected, a summary of the device settings should appear in a separate window. Close this window to begin adjusting the internal settings.
- Ensure to note the station’s protocol version.
- Change the protocol and interface in the COMMS settings to SDI12.
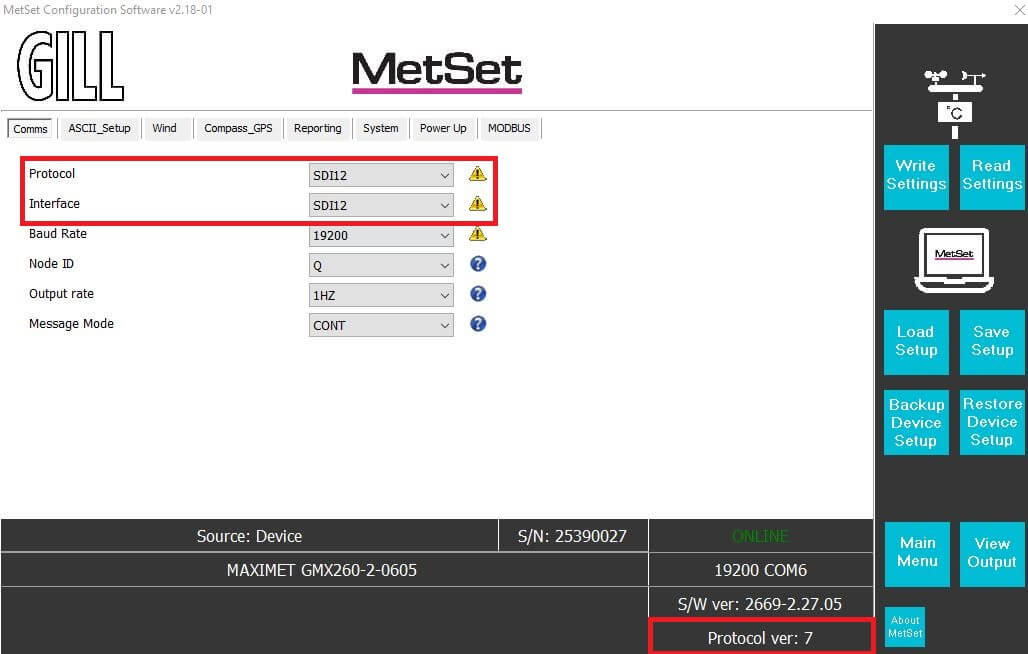
- The sensor is now ready for communication with the NexSens logger.
- Before exiting, follow the manufacturer’s guidelines to adjust sensor parameter settings and to assign a new SDI-12 address, if necessary (default = 0).
2. Gill MaxiMet Model Selection
MaxiMet models will vary based on their parameter output. Thus, the correct model and parameters must be selected from CONNECT’s sensor library.
- Download the latest version of CONNECT. Connect the logger to a PC and launch CONNECT.
- On the Config tab, click the drop-down arrow to the right of the Create Script button and select Generic SDI-12.
- The Script Utility menu will appear.
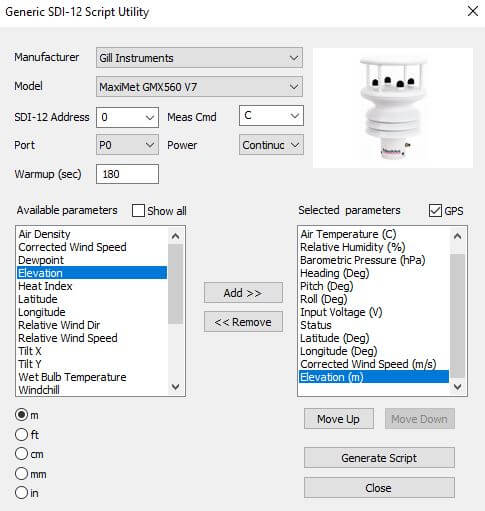
- Under Manufacturer, select Gill.
- Under Model, select the model you are connecting.
- For all models not using protocol version 7, select the Generic option.
- SDI-12 Address – Enter the sensor’s SDI-12 address. Each sensor must have a unique address for proper communication.
- Measurement Command (Meas Cmd) – The measurement command should always be ‘C,’ which allows measurements to be obtained concurrently with other SDI-12 sensors connected to the logger.
- Port – Select the data logger port the Gill will be connected to.
- Power – Select the power type required for the sensor.
- Switch – Turns on power to the listed sensor port at a specified period of time ahead of each scheduled reading. The sensor powers off once the logger collects data for the reading.
- The Warmup field determines how long the sensor will be powered in advance of each reading. This should be longer than the averaging settings of the sensor, based on the output rate and short-term/long-term average. See the MaxiMet manual for more details.
- Continuous – Power will be applied constantly.
- None – No power is applied to the port.
- Switch – Turns on power to the listed sensor port at a specified period of time ahead of each scheduled reading. The sensor powers off once the logger collects data for the reading.
- The available parameters list shows only those that typically apply to the selected model (select Show All to remove this filter).
- The sensor’s default parameter output automatically appears in the Selected Parameters column, but can be customized.
- For Protocol Version 7 models, the total number and ordering of parameters will be correct and remain so even if the parameters are moved or adjusted.

- On models with GPS capability, checking the GPS box will add Latitude (Deg), Longitude (Deg), and Elevation (m). It will also change Relative Wind Speed (m/s) to Corrected Wind Speed (m/s).
- For older models (select Generic), the total number and ordering of parameters for the script must match the parameter output for the sensor.
- If the sensor outputs a diagnostic or undesirable parameter as a part of its measurement command, it can be omitted from logging to the X3. Substitute the _None parameter into its position on the Selected Parameters list.
- For Protocol Version 7 models, the total number and ordering of parameters will be correct and remain so even if the parameters are moved or adjusted.
- Select Generate Script, assign a script number and click OK to save the script in the CONNECT software folder.
- If creating multiple generic scripts for the X3, assign a unique value to each.
- If making modifications to an existing generic script, assign the same script number to overwrite the original.
3. Automatic Sensor Detection
Once the script is created, transfer and enable it on the data logger.
After the script is enabled, run a sensor detection to program the sensor onto the logger.
Read Sensor Configuration – Confirm Sensor Detection
After ~5-10 minutes, read the sensor configuration to confirm the weather station and other sensors have been detected on the data logger. Thoroughly review the parameter list to ensure all parameters are accounted for and are measured in the desired units. Let the unit gather a few readings to confirm accurate and reasonable parameter data.
4. Setting up WQData LIVE
Once an X-Series data logger has finished a new sensor detection, it will automatically push the sensor configuration to the WQData LIVE web data center. Follow the three articles below to create a WQData LIVE account and a project/site. Then add the data logger to the project using the included claim code.
- Create a WQData LIVE Account
- Create a Project on WQData LIVE
- Add a Data Logger to a Project on WQData LIVE