
CONNECT Setup
CONNECT is a software utility that enables users to interface directly with any NexSens X-Series data logger using a UW6-USB-485P-DC cable. It supports a growing number of diagnostic and configuration tools to facilitate system setup and troubleshooting.
Software Installation
The CONNECT software requires a Windows-based device running Windows 10 or later. Fill out the form and download the software using the link below.
Once downloaded:
- Launch the downloaded application to begin the installation. If prompted by Windows, permit the app to be installed by clicking More info and then Run anyway.
- Select Next to start the installation wizard. Then, specify the program’s installation folder and user accessibility.
- Click Next to confirm the installation. Wait until the installation is completed and a successful prompt is displayed.
Download USB Drivers
The USB drivers must be installed to communicate properly with the CONNECT software. Connect the USB cable to the PC first to allow the download. Connecting to the logger during the driver installation can result in incomplete installation. The PC must be connected to the internet to install the USB drivers automatically. To confirm the drivers were installed correctly, open the Windows Device Manager to verify the COM port (USB Serial Port (COM xx)).

Figure 1: Windows Device Manager
If the USB device does not install correctly, consult a network administrator. The USB drivers can be downloaded manually at the following link:
- VCP Driver Download
- Scroll down to the Windows Desktop operating system and select the executable file link.

Figure 2: Download of VCP driver executable file.
Establish Connection
- Launch the CONNECT program.
- From the Properties window, select the proper COM Port for the cable from the Comm Settings tab on the far right.
- Baud must be 57600 for communication with the X2.
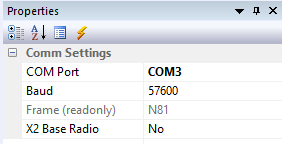
Figure 3: Properties | Comm Settings.
- Connect the UW plug end of the USB cable to the center 6-pin port of the X-Series data logger or the SOLAR/COM port of an X2-CB buoy.