
Enable Iridium Communication on an X-Series Data Logger
Satellite/Iridium transmission is more expensive than other traditional forms of communication (e.g., cellular, radio, Wi-Fi). Therefore, it is imperative that the end-user only transmit the most useful diagnostic and sensor parameters. The CONNECT software can set these parameters before the data logger transfers data to the web, thus reducing the overall data transfer.
If a sensor detection has not been performed, follow the included quick start guide to complete the detection process. Also, if you have not yet done so, set up the project in WQData LIVE. Once those are complete, place the logger in an area with a full view of the sky and no overhead obstructions to ensure adequate Iridium signal strength. Then, follow the steps below:
1) Set Transmit Flags
Transmit flags control which parameter data is transmitted to WQData LIVE. Setting the transmit flags allows the user to control the amount of data that is transmitted to the web at each interval. It is important to review the iridium plan purchased through NexSens or a 3rd party provider to ensure the data size does not exceed the allowable limit.
- From the CONNECT main window, select the TRANSMIT tab.
- Select Read from Logger.
Figure 1: Read current transmit flags.
- Enable parameters by adding the check mark next to the parameter name and then clicking Save to Logger.
- It is advised to enable transmit flags for the following internal logger parameters:
- Primary Power
- Internal Humidity
- Cell Signal Strength
- Cell Status
- It is advised to enable transmit flags for the following internal logger parameters:
- Once that is complete, go to Tool | WQData LIVE | Setup WQData LIVE.
- This command will push the system configuration to the web.
2) Review WQData LIVE Setup
Review the sensors and parameters on WQData LIVE to ensure everything has been pushed up properly. Note: Data will not upload until the next step is performed.
3) Update Logger’s Binary Format
- Once the configuration is visible, the user must send the “Update Binary Format” command from WQData LIVE.
- The binary format command will provide the settings outlined in the CONNECT software.
- Navigate to the ADMIN | Settings tab at the top of the WQData LIVE Project Dashboard.

Figure 2: ADMIN | Settings tab.
- Click on the Advanced Device Remote Configuration drop-down menu and choose the logger.
- Enter code ‘nexsens’ when prompted.
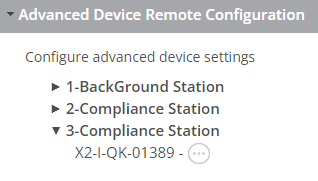
Figure 3: Advanced Device Remote Configuration drop-down menu.
- Click the UPDATE button underneath Update Binary Format.
- A prompt should display showing that the command was sent successfully.
- After the command is sent, three full transmission intervals will occur before data is pushed to the web.
- The logger will pull this remote command from the email at the first transmit interval.
- The logger will provide the updated format at the second transmit interval.
- WQData LIVE will process this format and be able to parse the data that is pushed on the third transmit interval.