
Download/Send Data Exports
Before downloading or sending a data export, ensure that the export has been configured with the correct format and includes all desired parameters. The following articles discuss each available data export format and how to set a date range schedule for the export.
Downloading a Data Export
Select the Download option to locally save a CSV, GLOSXML, or NDBCXML file of the data export depending on the chosen format.

Figure 1: Data Export Download option.
Sending a Data Export
Recurring data exports may be sent through email or FTP to multiple recipients or a secure network. There are two options for sending a data export to an outside party:
- FTP/SFTP
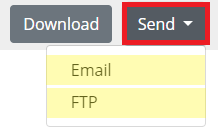
Figure 2: Send options – Email or FTP.
The Email Export option allows a data export to be sent to multiple recipients.
- Enter the name of the data export in the Filename field.
- Enter the email addresses line-by-line that will receive the export in the Emails field.
- If an email address is too long, expand the box by clicking the two lines at the bottom right and dragging the box outward.
- There are two Action options for sending emails:
- Send Now sends a single, immediate email to the specified addresses.
- Schedule allows sending of the export via email at a recurring interval.
- Click DONE at the bottom to send the email or apply the schedule.
- A pop-up message will confirm successful sending of the email.
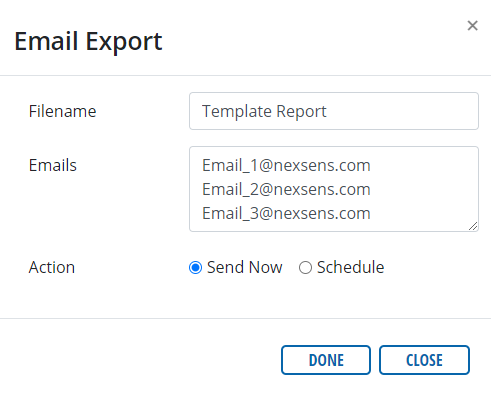
Figure 3: Immediately send data export to desired email addresses. |
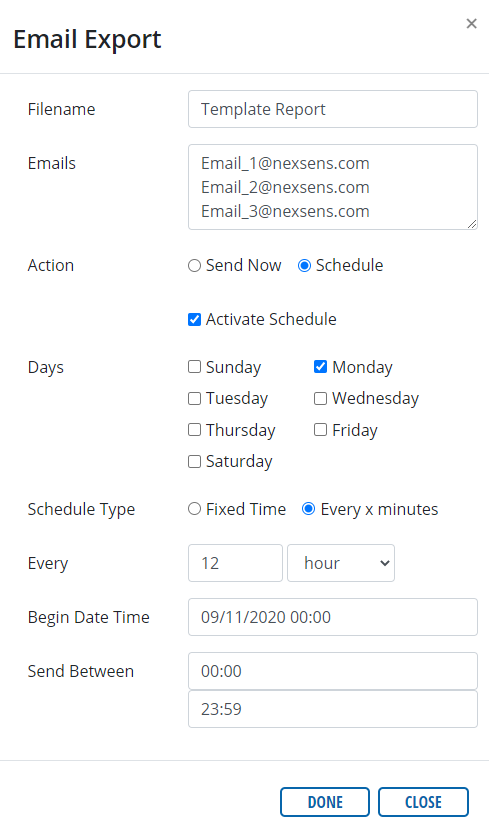
Figure 4: Example – Send data export to desired email addresses on Monday every 12 hours. |
FTP/SFTP
The FTP/SFTP option allows the user to send the exports to a specified network location.
- Enter the name of the data export in the Filename field.
- The following information must be known and entered to send the file correctly:
- Network Host
- Network Port
- Username
- Password
- Network Directory
- Protocol (FTP, FTPS, or SFTP)
- Transfer Mode (Active or Passive)
- For memorized/saved exports, the FTP/SFTP option also contains the two schedule actions listed above in the Email Export section.
- Click DONE at the bottom to send the report.
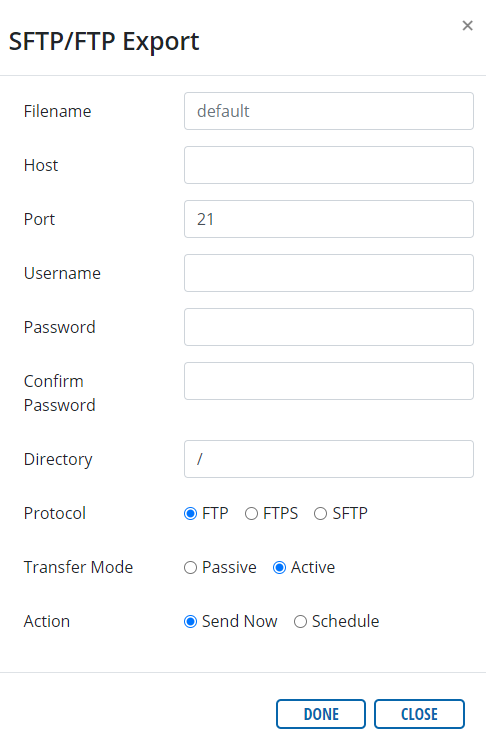
Figure 5: SFTP/FTP Export option.