In certain monitoring applications, it’s necessary to ensure that equipment stays within defined areas. This is made possible by GPS equipment and bounding alarms that can be set in iChart.
1. Record the upper and lower GPS coordinates of the desired bounding rectangle. GPS1 and GPS2 form two corners of the bounding rectangle in Figure 1 below. When a reading falls outside of the set bounding rectangle, the iChart alarm will be activated.
Note:
- This alarm method does not take into account the curvature of the earth, allowing it to work in small areas
- GPS1.Lat and GPS2.Lat = latitudes of the two GPS coordinates that define the bounding area
- GPS1.Long and GPS2.Long = longitudes of the two GPS coordinates that define the bounding area

Figure 1: GPS1 and GPS2
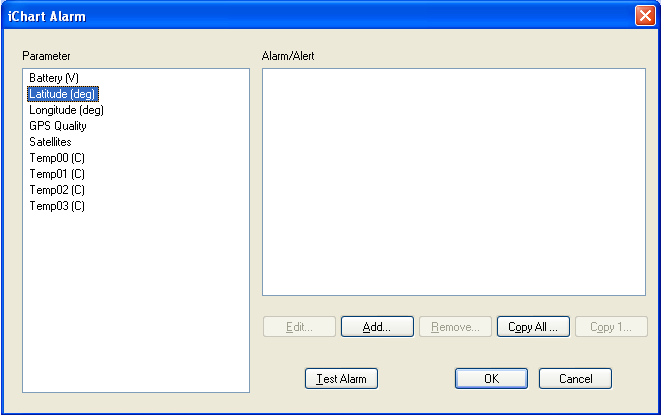
2. In the current iChart project, select Project | Setup iChart Alarm. The iChart Alarm dialog box should appear.

Figure 2: iChart Alarm Dialog Box
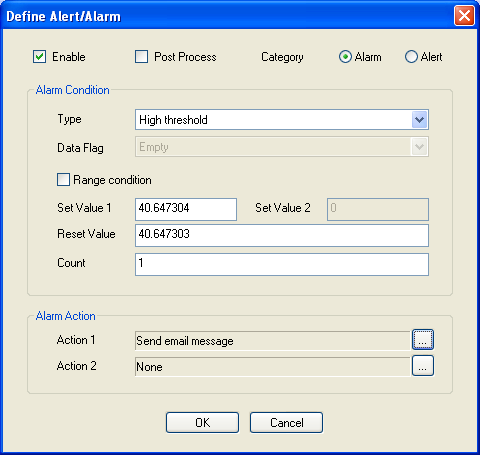
3. Select the Latitude (deg) parameter. Click Add to define a new alarm or Edit to modify an existing alarm. The Define Alert/Alarm dialog box should appear.

Figure 3: Define Alert/Alarm Dialog Box
4. To define the GPS1.Lat bounding alarm, select High Threshold in Type. Enter the value of GPS1.Lat in the Set Value 1 box.
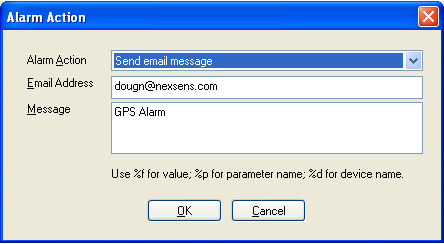
5. Click Action 1 (…) to configure an alarm action. The Alarm Action dialog box should appear. Options within the Alarm Action dialog box will vary depending on the action selected.

Figure 4: Alarm Action dialog Box
6. Once an available action choice is selected, enter the requested information. Click OK in the Alarm Action dialog box.
7. Click OK in the Define Alert/Alarm dialog box. The alarm should appear within the iChart Alarmdialog box (Figure 2). The alarm for GPS1.Lat has been set.
8. Select the Latitude (deg) parameter. Click Add to define a new alarm or Edit to modify an existing alarm. The Define Alert/Alarm dialog box (Figure 3) should appear.
9. To define the GPS2.Lat bounding alarm, select Low threshold in Type. Enter the value of GPS2.Lat in the Set Value 1 box.
10. Click Action 1 (…) to configure an alarm action. The Alarm Action dialog box (Figure 4) should appear. Options within the Alarm Action dialog box will vary depending on the action selected.
11. Once an available action choice is selected, enter the requested information. Click OK in the Alarm Action dialog box.
12. Click OK in the Define Alert/Alarm dialog box. The alarm should appear within the iChart Alarm dialog box (Figure 2). The alarm for GPS2.Lat has been set.
13. Select the Longitude (deg) parameter. Click Add to define a new alarm or Edit to modify an existing alarm. The Define Alert/Alarm dialog box (Figure 3) should appear.
14. To define the GPS1.Long bounding alarm, select Low threshold in Type. Enter the value of GPS1.Long in the Set Value 1 box.
15. Click Action 1 (…) to configure an alarm action. The Alarm Action dialog box (Figure 4) should appear. Options within the Alarm Action dialog box will vary depending on the action selected.
16. Once an available action choice is selected, enter the requested information. Click OK in the Alarm Action dialog box.
17. Click OK in the Define Alert/Alarm dialog box. The alarm should appear within the iChart Alarm dialog box (Figure 2). The alarm for GPS1.Long has been set.
18. Select the Longitude (deg) parameter. Click Add to define a new alarm or Edit to modify an existing alarm. The Define Alert/Alarm dialog box (Figure 3) should appear.
19. To define the GPS2.Long bounding alarm, select High threshold in Type. Enter the value of GPS2.Long in the Set Value 1 box.
20. Click Action 1 (…) to configure an alarm action. The Alarm Action dialog box (Figure 4) should appear. Options within the Alarm Action dialog box will vary depending on the action selected.
21. Once an available action choice is selected, enter the requested information. Click OK in the Alarm Action dialog box.
22. Click OK in the Define Alert/Alarm dialog box. The alarm should appear within the iChart Alarm dialog box (Figure 2). The alarm for GPS2.Long has been set.
All GPS boundings have been set. For information on copying these alarm settings to other sites, refer to the iChart manual.
Note: After copying the alarm settings to other sites, it will be necessary to modify the GPS coordinates appropriately for each additional site.
REV: 13G18
