
Setting Alarms
The Alarm feature offers an advanced method of configuring email notifications for parameter measurements. Alarms trigger based on one or more user-defined conditions established in the alarm configuration.
Setting Alarms in Administrator Settings
The ADMIN menu allows the user to activate alarms or quick alerts that notify project personnel any time that a certain parameter crosses a user-specified threshold.
- Navigate to ADMIN | Alarms on the WQData LIVE Project page.

Figure 1: ADMIN | Alarms settings.
- Expand the Alarms/Alerts section by clicking on the gray bar (if it is not already showing). Click ADD ALARM/ALERT.
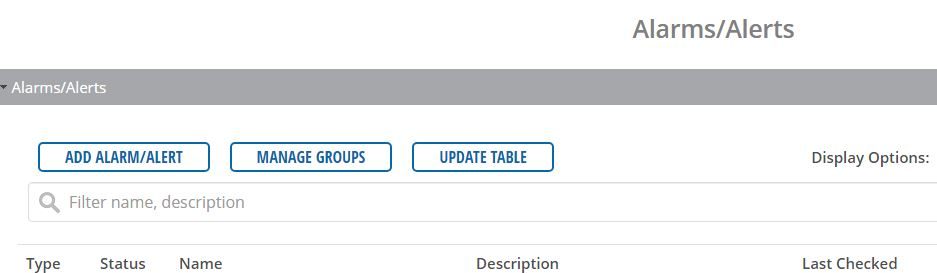
Figure 2: Select ADD ALARM/ALERT.
- Complete each section of the configuration menu that appears.
- General Info – This allows the user to input a name and description for the alarm, set the time zone and active datetime range. It also contains the enable/disable option for the alarm.
- Designate the notification type as an Alert or Alarm. Aside from naming, the only defining difference between the two is the map marker effect when triggered.
- The Timezone of the alarm is based on geographic location by default. To change this, select a different timezone from the drop-down list.
- Adjust the Active Days for the alarm depending on what days the alarm is necessary.
- All 7 days of the week is the default setting. Select at least one day to validate the alarm.
- Although the alarm will still function normally outside of the specified days, WQData LIVE will not send any email notifications.
- The Active From/To field forces WQData LIVE to send alarm notifications to the user only at the user-specified interval during the day.
- Although the alarm will still function normally outside of the specified time range, WQData LIVE will not send any email notifications.
- The time format for this function is in hours and minutes (hh:mm).
- Leave this option empty to receive notifications of alarms triggered at any point during the day.
- Check the Multi-Trigger option to send an email continuously throughout the alarm’s active duration. Otherwise, only a single email notification sends when the alarm is first activated.
- General Info – This allows the user to input a name and description for the alarm, set the time zone and active datetime range. It also contains the enable/disable option for the alarm.
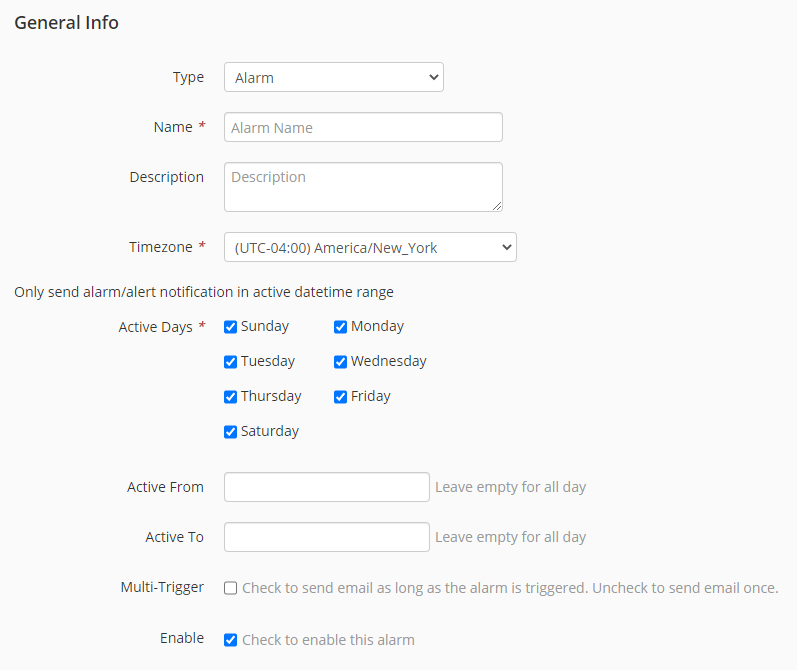
Figure 3: Alarm General Info configuration menu.
-
- Trigger Conditions – Sets the threshold values for activation of the alarm. Multiple triggers can be submitted for the same alarm. Included in the trigger condition(s) are:
- The data logger associated with the alarm.
- The parameter associated with the data logger.
- The threshold (greater than, less than, etc.) that activates the alarm.
- The time interval over which all readings must meet the conditions to activate the alarm.
- Trigger Conditions – Sets the threshold values for activation of the alarm. Multiple triggers can be submitted for the same alarm. Included in the trigger condition(s) are:

Figure 4: In this example, the alarm is triggered when the temperature is greater than 30°C AND the dissolved oxygen concentration drops below 6.5 mg/L for all readings in the last 10 minutes.
-
- Trigger Action – Optional configuration of actions including notification via email or SMS text message when the alarm is triggered.
- Set the Recipient Type either to individual emails or a user-generated Group.
- For individual emails, enter one per line in the Recipients box.
- For Groups, select a previously created Group from the list, or create a new one.
- The Message gives the group or individuals a summary of what the alarm means and sends at each triggered alarm.
- Expand the message box by clicking on the diagonal lines in the lower right hand corner of the box and dragging them outward if necessary.
- Optionally check the Include Current Parameters Value box to include the latest data readings in the alarm message.
- Set the Recipient Type either to individual emails or a user-generated Group.
- Trigger Action – Optional configuration of actions including notification via email or SMS text message when the alarm is triggered.
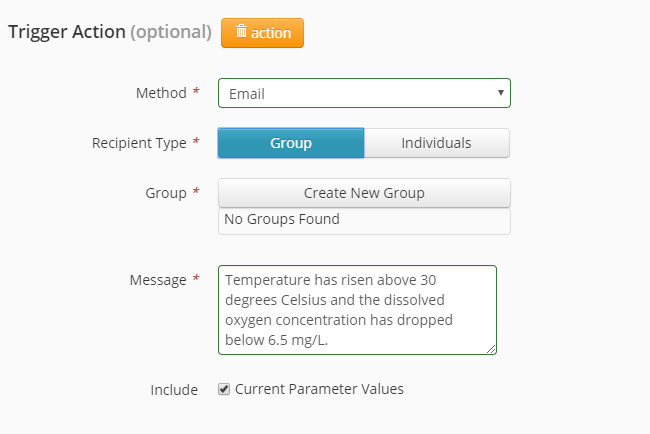
Figure 5: In the example above, the user would have to create a new group. Each time the alarm is triggered, the message entered will be emailed to the group.
-
- Reset Conditions – Defines the condition(s) required to reset the alarm. The alarm will not trigger again in the future unless it first resets. Ensure that the reset conditions match what will occur in the field so that the alarm resets properly.
- Parameters are the same as those for the Trigger Action.
- Reset Conditions – Defines the condition(s) required to reset the alarm. The alarm will not trigger again in the future unless it first resets. Ensure that the reset conditions match what will occur in the field so that the alarm resets properly.
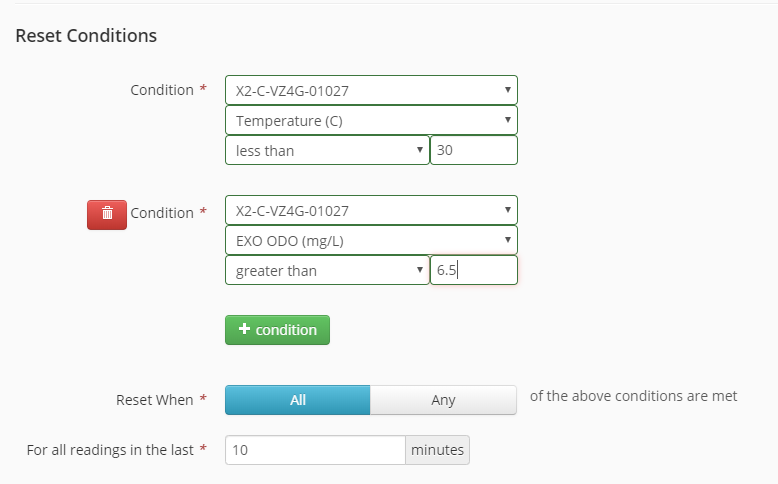
Figure 6: In this example, the user has set an alarm that is reset when the temperature is less than 30 degrees Celsius AND the dissolved oxygen concentration rises above 6.5 mg/L for all readings in the last 10 minutes.
-
- Reset Action – Notifies alarm recipients via email upon resetting of the alarm.

Figure 7: Each time the alarm is reset, the message will be sent to the alarm group.
- Ensure to click SAVE at the lower right corner of the menu to activate the alarm. A summary of the alarm will then appear. Review the details and then make any edits to the alarm if necessary.
- At this time, optionally click the TEST button at bottom right of the overview menu to verify an alarm.

Figure 8: Test Alarm confirmation.
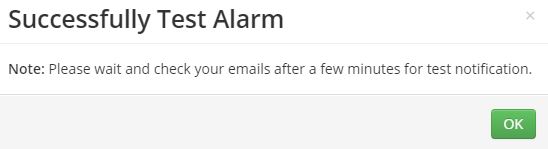
Figure 9: Test Alarm success notification.
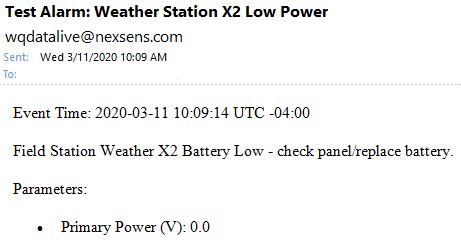
Figure 10: Test notifications will display Test Alarm in the email subject line and have a default parameter value of 0.0.
- The ADMIN | Alarms/Alerts section of the project page (see step 2) lists all configured alarms and alerts. The overview shows their status and last trigger times, and color codes based on status.
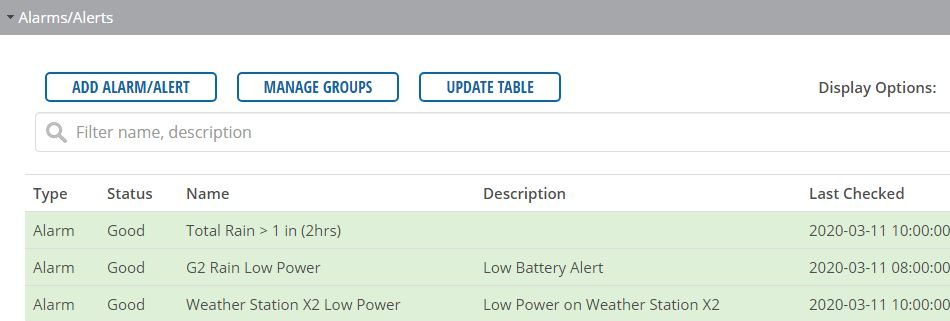
Figure 11: Project Alarms/Alerts summary.
- If necessary, edit or delete existing alarms by selecting the desired alarm from the list to open the edit menu.
- To delete, click Remove at the bottom of the alarm editing menu.