
Configure X2 Base Radio Local Alarm
The CONNECT X2 base radio utility can monitor the status of configured alarms on a WQData LIVE project. When the base radio utility is enabled, a base radio X2 can optionally be tasked to trigger a local alarm in the event that traditional methods of notifications (SMS or email) are not available.
This works by turning on 12V power at the P2 sensor port whenever a WQData LIVE triggers a corresponding alarm. An external device connected to this port, such as a buzzer or beacon, then notifies personnel of the alarm.
Note: An active internet connection on the PC running the CONNECT software is required for data to be uploaded to WQData LIVE and local alarming to be processed.
Activate Local Alarm Feature
- Configure the X2-Base Radio following the article below.
- Locate the WQData LIVE Project ID number. This appears as the first number in the URL.

Figure 1: WQData LIVE Project ID number 749 in this example.
- From the Upload tab, navigate to Tool | Local Alarm in CONNECT.
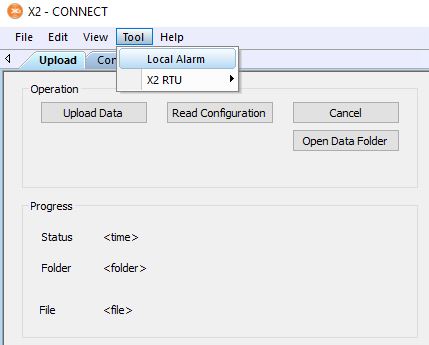
Figure 2: Open CONNECT Local Alarm menu.
- Complete the Local Alarm setup, then click OK.
- See Step 2 to locate the WQDataLIVE Project ID.
- Contact NexSens Technology to acquire the unique WQDataLIVE Alarm IDs for which the offline alarming should be based.
- Set the Silent Duration (min), which is the period between alarm activations.
- If the alarm is still active, the X2 base radio will provide 12V power again to port P2 to acknowledge the continuation of the alarm.
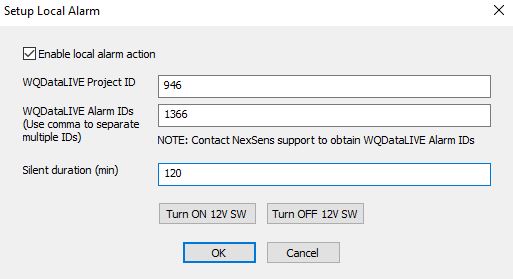
Figure 3: Setup Local Alarm menu.
- If desired, test the external 12V notification device manually toggling on the X2 Base’s 12V sensor port power. Use the Turn ON 12V SW or Turn OFF 12V SW options accordingly.
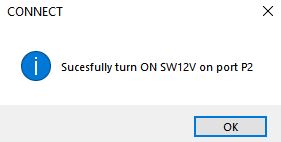
Figure 4: Toggle 12V switch on/off to test alarm.