This guide is designed to help you fix common problems associated with failed over-the-air communication between a cellular iSIC or SDL data logger and a computer. Cellular communication problems can arise for a number of different reasons, including low power, weak cellular signal strength, improper physical connections, activation issues, or data account setup problems.
To troubleshoot this problem, check for communication with iChart software after each step in the procedure below.
1. Check the serial connection to iSIC data logger
- Cellular iSIC data loggers must have the cellular modem cable plugged into the serial DB-9 port between the iSIC data logger terminal strips to enable remote telemetry.
2. Check power
- Remove the data logger’s fuses by pressing down on the fuse holder caps while twisting counterclockwise. Visually inspect the fuses for damage. If damage is suspected, use an ohmmeter to confirm continuity throughout the fuses or replace the fuses with known good fuses.
- Look for a green blinking LED above the analog terminal strip immediately after plugging the fuses back in. The light should blink for a few seconds, indicating that the iSIC is properly powered.
- Check the battery terminal connections (red on positive and black on negative) for damage or loose connections
3. Check antenna
- Make sure the antenna is in a location that will maximize signal strength.
- Check the RF connection and make sure no excess moisture and/or water is present. Also, check the connectors for corrosion and examine the RF cable for damage.
4. Verify cellular activation
- Determine if the modem is activated. Typically cellular modems are activated, configured, and tested by NexSens prior to leaving our lab.
- If the modem has not yet been activated, please see one of our Technical Note Manuals on how to activate a cellular modem available on our Knowledge Base.
5. Check SIM card (AT&T only)
- A SIM card is required to encrypt transmissions and identify a user’s account to the mobile networks. Make sure the SIM card is properly installed in the cellular modem. Consult the AT&T Raven XT quick start guide for additional details.
6. Ping the modem
- A ping tests the reachability of a host on an IP network and measures the round-trip time for messages sent from the host to a destination computer. To send a ping:
1) Open the Windows command prompt. For Windows Vista or 7: From the Start menu select All Programs | Accessories | Command Prompt. For Windows XP or 2000: From the Start menu select Run, type “cmd” and click OK.
2) In the command prompt, type “ping” followed by a space and then the IP address of the cellular modem. Press “Enter” and the computer will send four echo request packets. Allow 60 seconds for response packets to be received.

Figure 1: Ping the Modem
3) If a connection is established, a response with packet information and communication quality is displayed. Otherwise a “Request timed out’” response will be displayed.
- Over-the-air communication has a latency associated with it. Because of this, response times of less than 100 ms indicate that the IP address is not a cellular modem.
Note: Make sure to take out any leading zeros in the IP address. For example, 166.156.142.044 is actually 166.156.142.44. If the zero is added, then the number will be converted to octal (0442 = 0 x 82 + 4 x 81 x 4 x 80 = 368). The address would then be 166.156.142.36.
7. Connect with Wireless AceManager
- Wireless AceManager is a software program used to configure and communicate with Raven XT cellular modems.
- Try to connect over-the-air:
1) Go to http://www.nexsens.com/support/downloads.htm and select the software setup package for the appropriate service provider. Fill in the software download form and click Download Software.
2) Install and open AceManager Software.
3) Cycle power to the iSIC data logger to reset any network activity in the cellular modem.
4) Click Connect in AceManager and select UDP as the connection type. Enter the IP address of the modem. Do not change the password and click OK.

Figure 2: Connect to AceManager
5) Click the Status group and verify that the Network IP displayed is the same IP address associated with the cellular data account.
- If over-the-air communication fails, try connecting directly to the modem to check its configuration.
1) Unplug the serial DB-9 connector from the iSIC. Then connect an A77 programming cable (provided with data logger) from the modem cable inside the iSIC to a PC.

Figure 3: Connecting the A77 Cable
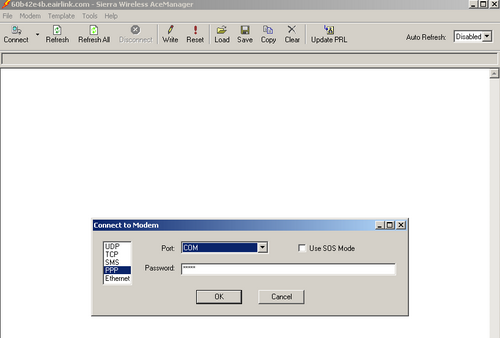
2) With the physical connection between the cellular modem and PC established, click Connect in Ace Manager. Select PPP as the connection type and the COM port the modem is connected to. Do not change the password. Click OK.
3) Click the Status group and verify that the Network IP displayed is the same IP address associated with the cellular data account. If it is the same, then the account is likely not provisioned correctly. Otherwise, try connecting over-the-air to the Network IP that is displayed.
8. Check your data account
- Contact the cellular provider and ensure that these (3) general account requirements are enabled:
1) Unrestricted Access
2) Static Public IP Address
3) Mobile-Terminated
If none of the above procedures isolated and corrected the problem, contact NexSens technical support for additional troubleshooting.
REV: 13G18
