
Update Firmware
Firmware is updated periodically to add new features, support more environmental sensors, and resolve bugs. The X3 Environmental Data Logger includes built-in Bluetooth connectivity (BLE 5.0). Using the CONNECT software (version 4.24.5.2 or later), users can update the firmware wirelessly via Bluetooth. During the update, CONNECT will temporarily disable the logger’s internal schedule to prevent interference with the transfer.
Preparation
- Verify your PC or laptop supports Bluetooth BLE 5.0.
- Disable Bluetooth on nearby devices to avoid connection conflicts.
- If using a Bluetooth dongle, NexSens recommends the TP-Link Bluetooth 5.0 Nano USB Adapter as an affordable and reliable option.
Note: X3 data loggers include both a MAIN and RTU CPU. The firmware for both must be updated; thus, this process must be completed twice.
Code Update via Bluetooth (X3 loggers only)
- Open the firmware update utility
- In CONNECT, navigate to Tool | Code Update X3 (BLE)
- The X3 Firmware Update (BLE) utility will open.

Figure 1: Firmware update Bluetooth utility.
- Select the Correct Logger
- Confirm that the device name matches the logger’s body tag.
- Select either X3MAIN or X3RTU, depending on the firmware type being updated.
- Once the correct logger appears, enter the last five digits of the logger’s body tag (e.g., 01161) as the Passcode.
- Do not check the Quick Transfer box, as this can cause a delay before the success prompt appears.
- Notes:
- The X3’s Bluetooth automatically turns off 5 minutes after cycling power. If the logger name isn’t visible, manually cycle power or reset the device and click Re-Scan.
- If the logger still isn’t shown, double-check your device’s Bluetooth settings.
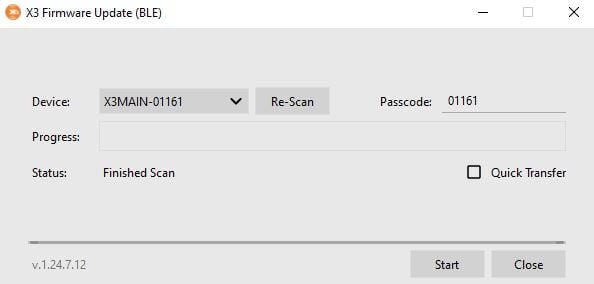
Figure 2: X3 Firmware Update (BLE) utility.
- Start the Update
- Select Start, then click Yes to confirm.
- The utility will display progress as the file transfers.
- Once complete, the Status will show: Sending OTA done.
- The logger will reset automatically to finish the update.

Figure 3: Firmware update in progress.
- Repeat for both CPUs
- Remember: The X3 logger has two CPUs (MAIN and RTU).
- The firmware update process must be completed twice—once for each.