
Configure iSIC-V2 Ethernet Settings
While the iSIC-V2 Ethernet data logger is capable of acquiring network settings from a DHCP server automatically, it is also possible to configure these settings manually.
Establish Direct Terminal Connection
- Follow this article to establish a terminal connection with the iSIC-V2 using a USB-RS485 cable.
Set Static Network Connection Settings
- If DHCP is enabled, the iSIC-V2 will attempt to establish a connection and retry in the event of a failure. Hit Enter or Ctrl+C to stop the text and open up a command line.
- To assign specific network settings to the iSIC-V2, use the following commands to first turn dhcp off.
- set dhcp off
- Note that any user-configured network settings will be overridden if set to ON.
- set dhcp off
- Configure the network settings shown below. Note that <ipaddress> assumes the form of a.b.c.d where a, b, c, and d are 1 to 3 digit octets from 0 to 255.
- set ipaddr <ipaddress>
- Function: Set static IP address.
- Example: set ipaddr 192.168.1.48
- set ipmask <ipaddress>
- Function: Set subnet mask.
- Example: set ipmask 255.255.255.0
- set ipgw <ipaddress>
- Function: Set default gateway.
- Example: set ipgw 192.168.1.1
- set dns <ipaddress>
- Function: Set preferred DNS
- Example: set dns 8.8.8.8
- set altdns <ipaddress>
- Function: Set alternate DNS.
- Example: set altdns 8.8.4.4
- set ipaddr <ipaddress>
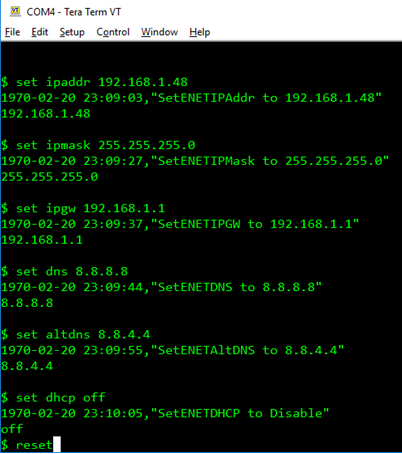
Network settings in the command prompt.
Verify Network Connection Settings
- Send the reset command.
- Verify the network changes have been successfully committed by sending the commands below.
- show dhcp
- show ipaddr
- show ipmask
- show ipgw
- show dns
- show altdns
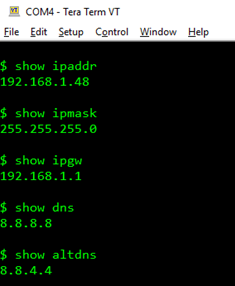
Verify network changes in the command prompt.
Test Network Connection
- Test the network connection by using the ping command.
- ping <domain>
- <domain> can be any valid IP address or a domain name such as google.com

Successful ping of nexsens.com
- Close Tera Term and disconnect the UW6-USB cable from the iSIC-V2.
- Reconnect the original UW6 12V power cable to the iSIC-V2.
- On power up the logger will attempt to connect to WQData LIVE.
- A successful connection is indicated by 2 consecutive beeps.
- A failed connection is indicated by 3 consecutive beeps.
- On power up the logger will attempt to connect to WQData LIVE.