
CB-Series Data Buoy Deployment Tips
NexSens Technology supplies mooring hardware to support user-designed systems but does not endorse any particular mooring strategy for any specific application and does not take responsibility for mooring performance or damage resulting from mooring failure.
NexSens CB-Series Data Buoys
The NexSens CB-series data buoys contain several mooring eyes on the underside of the buoy hull to accommodate single-point, two-point, and three-point mooring configurations. For two- and three-point moorings, use the mooring eyes located on the bottom of the hull. For single-point, use the mooring eye at the bottom of the buoy frame or instrument cage. Refer to the articles below to learn more about CB-Series buoy characteristics before deployment:

Figure 1: Two-point mooring system on CB-450 data buoy.
Connecting Mooring Hardware
For NexSens-supplied mooring systems, stainless steel bow shackles connect the various mooring components (i.e., mooring lines, marker buoys, chains, and anchors) together and to the CB-series buoy. 1/2” bow shackles connect mooring lines to the CB-series buoy eyes and 1/2” bottom chains. Larger, 5/8” bow shackles connect to the marker buoys and anchors.
Note: Shackle sizes are dependent on the thickness of the bottom chain. Shackles shown in the images below are used for 1/2″ galvanized chain, which is standard in most applications.

Figure 2: Shackle connections between the buoy tether line and marker buoy. |
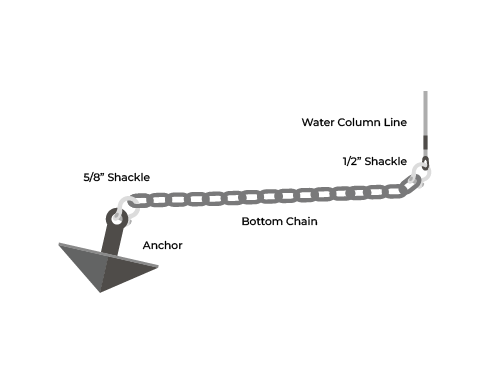
Figure 3: Shackle connections between the anchor, chain, and water column line. |
Bow shackles must be properly connected and secured to prevent loosening, especially in rough water conditions. To attach a mooring line, remove the pin from the shackle and run it through the thimble of the mooring line (left image below). Hand-tighten the shackle pin, then use a crescent wrench to tighten the connection. Insert a steel-lined cable tie or stainless steel wire into the hole on the shackle pin and run it through the shackle loop (right image below). Pull tightly to secure, and trim the excess.
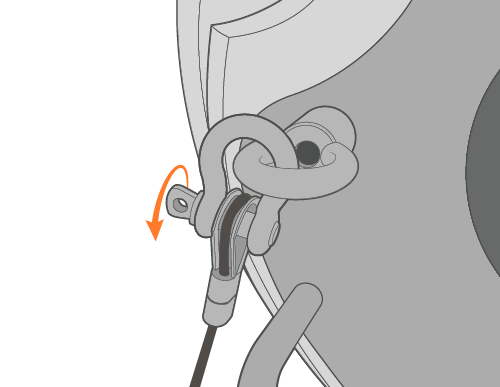
Figure 4: Tighten bow shackle. |
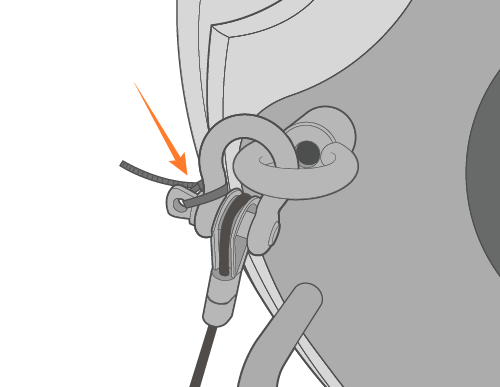
Figure 5: Secure shackle with a steel-lined cable tie or stainless steel wire. |
Buoy Deployments
Personnel safety is the number one priority when deploying a data buoy. Using proper equipment (e.g., workboat, lifting rig for heavier systems, gloves, safety footwear, etc.) is essential to deploy any buoy system safely. Buoy systems are heavy, and personnel can quickly become entangled with mooring lines and anchors. Safety and flotation gear should be worn at all times when working on or near the water.
Remember to perform a complete system test onshore before buoy deployments. Learning the system’s nuances is better handled onshore or in a lab rather than in the field.
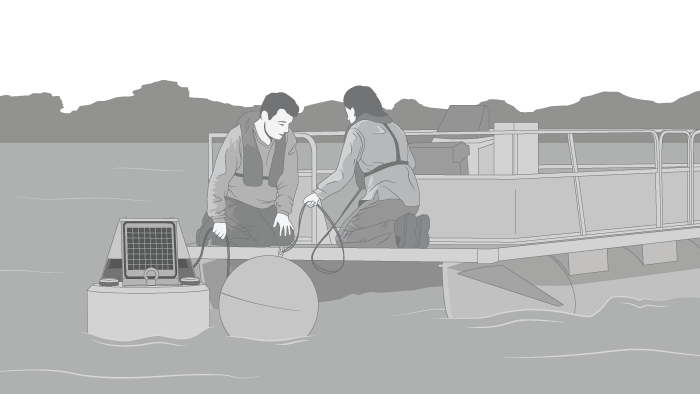
Figure 6: Safe deployment of a buoy system.
Single-Point Mooring Buoy Deployments
- With the buoy in the boat, begin by connecting all mooring hardware, including the mooring line’s connection to the bottom eye of the CB-series buoy.
- Lift the anchor over the side of the boat and release it in to the water at the chosen deployment location. Be sure that the mooring line and bottom chain assembly are long enough that dropping the anchor does not pull the buoy over the side of the boat. Pay out the mooring line so that it does not become entangled.
- Finalize any sensor connections and apply power, then lift the buoy over the side of the boat and carefully set it in the water.
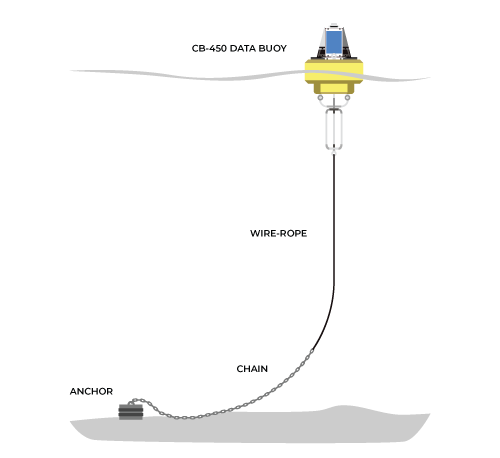
Figure 7: Single-point mooring system on CB-450 data buoy.
Two-Point and Three-Point Mooring Buoy Deployments
- Connect all mooring components inside the boat. Stage the components so that they can be lifted over the side of the boat and laid out without becoming entangled.
- Navigate to the chosen location for the first anchor. The distance from the anchor location to the location of the data buoy is best determined by drawing out a diagram of the mooring system and calculating the horizontal distance, taking into account the lengths of the mooring lines and the current water level.
- Lift the anchor over the side of the boat and place it into the water. Pay out the mooring line as the anchor sinks, using extreme caution to avoid entanglement of the line with personnel and equipment. Place the connected marker buoy in the water.
- Move to the desired location of the data buoy. Pay out the mooring line from the first marker buoy to the data buoy as the boat is moved.
- Finalize sensor connections and apply power, then lift the buoy over the side of the boat and set it in the water.
- Move onward to the location of the second anchor as the mooring line connecting to the second marker buoy is paid out.
- Drop the marker buoy in the water and continue to the calculated location for the second anchor.
- Lift the anchor over the side of the boat and lower it into the water.
- Again, pay out the mooring line as the anchor sinks, using extreme caution to avoid entanglement of the mooring line and especially to avoid entanglement of personnel with the mooring line.
- Repeat this process if a third mooring point is to be used.