
MCBH & MCIL Connector Operation & Maintenance
Multiple NexSens data logger models and CB-MCL wet-mate lids include male and female Micro-Circular Bulkhead (MCBH) connectors compatible with Micro-Circular In-line (MCIL) sensor connectors. These connectors are designed for use in wet conditions (not while submerged) as they force out water as connectors are mated. Like other connector types, MCBH and MCIL connectors still require proper lubrication and maintenance to avoid debris buildup that may allow moisture intrusion when deployed. Dielectric, silicon-based grease is typically applied as lubrication to repel water and protect metal components from corrosion.
Note: While these connectors are designed to force out water during mating, NexSens still recommends ensuring the connectors are completely dry before greasing and applying the connection.

Figure 1: X2-SDLMC MCBH connectors. |

Figure 2: X2-CBMC MCBH connectors. |
Required Tools
While cleaning and lubricating the connectors, it is essential to leave no residue or debris behind that will prevent the water-tight seal. The tools below will assist in cleaning and removing all contaminants from the connector pins and sockets.
- Compressed air (Uline “Air in a Can”)
- Lubricant grease for MCIL connectors (Krytox grease)
- Silicone-based lubricant grease for MCBH connectors (Molykote44 grease)
- Dummy plugs (with Locking Sleeves)
- Lint-free wipes (Kimwipes)
- Flashlight
- For viewing within female sockets.
- Steel-lined cable ties
- For securely mounting sensor cables.
- Isopropyl alcohol
- For removing corrosion.
Before Deployment
- Carefully clean the male MCIL and MCBH connector pins with a Kimwipe. Remove all grease, hair, dirt, and other contamination.
- Inject compressed air into the female MCIL and MCBH socket connectors to remove all debris.
- Use a flashlight to view the inside of the sockets properly.
- Do not insert any foreign objects into the socket connectors.

Figure 3: Remove debris from MCIL sockets with compressed air.
- Ensure both connectors are completely dry. If not, let them air dry.
- Apply a thin film of Krytox Grease.
- Caution: Do not use WD-40 or other petroleum-based lubricants, as they will damage the connectors.
- Only apply a small, even coating of grease. A pea-sized amount of grease should be sufficient. Extensive amounts of grease can allow for contamination. Connectors should appear shiny when grease is applied correctly.
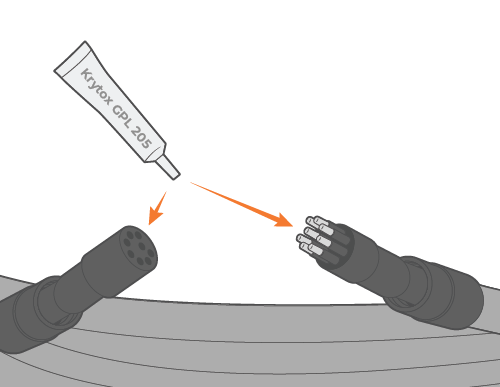
Figure 4: Apply grease to MCIL connectors before mating with MCBH bulkheads.
- Apply the connection, ensuring complete contact between the male and female connectors.
- Do not twist the cable boot or dummy plug, as this will lead to broken or bent pins.
- After greasing, connections should be smooth without the need for excessive force. If excessive force is required, remove the connection and apply more grease to the connectors.
- An audible pop may be heard when making the connection, a good sign that air is escaping, allowing for a vacuum-like seal.
- Squeeze the sides of the mating connector to eject any additional trapped air.
- Ensure no sharp bends are at the connector point or throughout the cable length.
- Avoid angular loads on the connector.
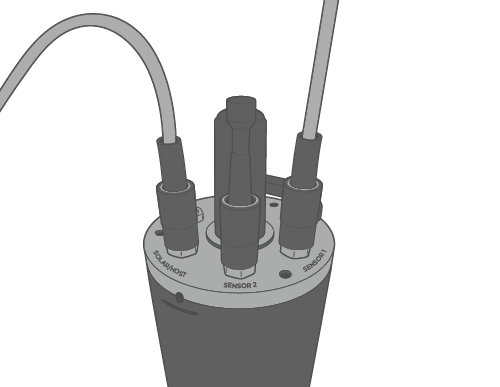
Figure 5: Proper sensor and power connections with vertical alignment. |
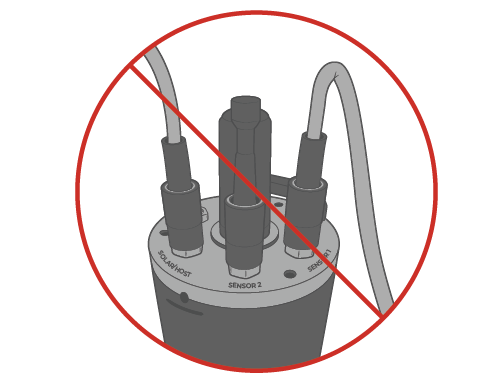
Figure 6: Improper connection of sensor cable resulting in a severely bent cable. |
- Avoid nicks and cuts around contact points and throughout the entire cable length.
- Cable armor should be installed around areas where the cable may contact abrasive surfaces.
- Secure the cable to the mounting fixture to avoid mechanical stress on the connector and constant friction with other surfaces.
- Steel-lined cable ties may be used for a secure connection.
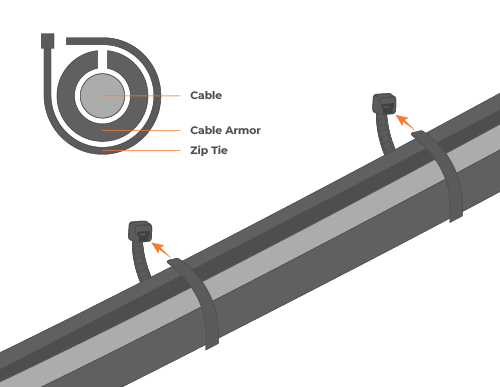
Figure 7: Application of cable armor around an exposed sensor cable. |

Figure 8: Secure mounting of a loose sensor cable. |
During Deployment
- Always install a freshly lubricated dummy plug when removing a sensor or solar panel connection for maintenance during deployment.
- While disconnecting, do not pull on the cable itself. Pull at the base of the connector after the locking sleeve has been entirely removed.
- Disconnect by pulling vertically, not at an angle.
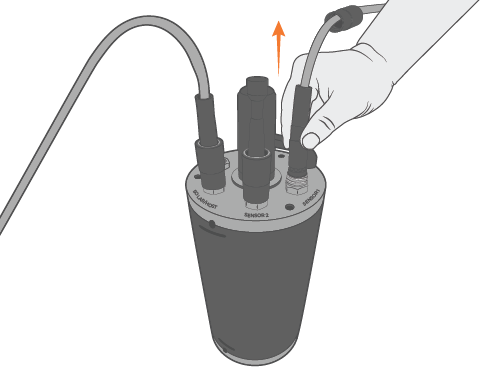
Figure 9: Proper disconnection of sensor cable with vertical removal. |
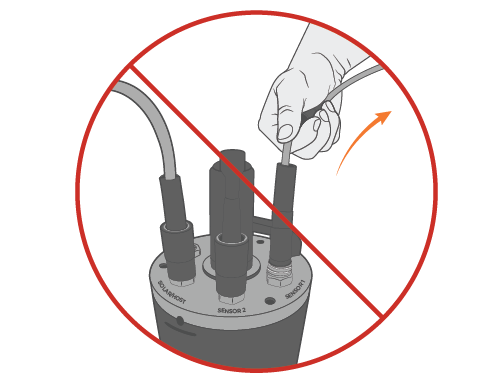
Figure 10: Improper disconnection of a sensor cable. |
- Inspect for damaged or bent pins, corrosion, or cuts along the cable or connection point.
- Pins should be shiny without discoloration. If pins are discolored or corroded, then clean them with isopropyl alcohol and a Q-tip.
- Replace all severely corroded or damaged pins immediately.
- Follow the steps outlined in the Before Deployment section before re-applying the connection.
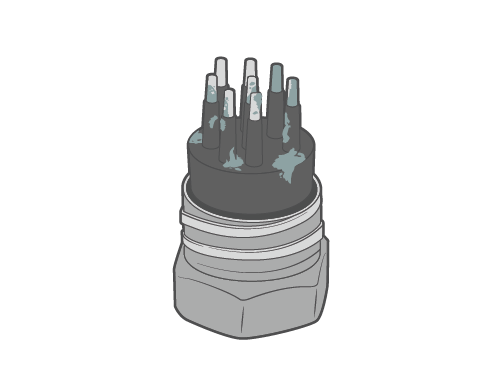
Figure 11: Corroded pins on an MCBH connector. |
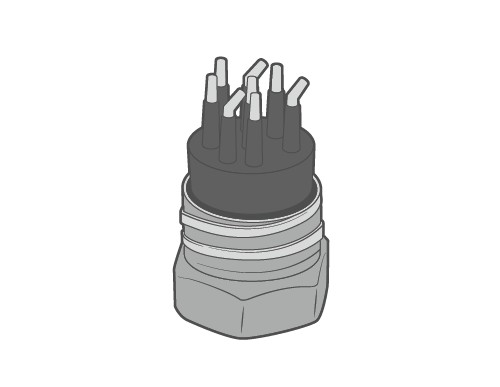
Figure 12: Bent pins on an MCBH connector. |
- If possible, reduce the amount of direct sunlight exposure on the connectors to avoid UV degradation.
- Before removing a frozen connector, wrap the connection with a cloth and apply hot water. After a minute or two, the connection will thaw and be flexible enough to remove thereafter.
After Deployment/Storage
- Before storage, ensure to conduct the same maintenance steps required before deployment.
- Leave the connections in place during storage to protect the connectors.
- Caution: Always remove the solar panel connection and install a dummy plug when storing an X2 data logger.
- Store the equipment safely, free from direct sunlight and high humidity.
- Avoid sharp bends at the connector or through the cable during storage.
- If connections must be disconnected for sensor maintenance or calibration, ensure to install a dummy plug onto the connectors while exposed.