
Why is my sonde not communicating with a NexSens data logger?
YSI EXO sondes need regular cleaning and calibration to maintain accurate long-term data. However, if the sonde is reconnected but doesn’t respond, you may see the following errors:
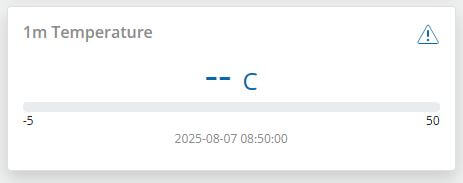
Figure 1: Dashed response from the sensor indicating no communication. |

Figure 2: Error code (-100000.0) shown in WQData LIVE data table. |
In the images above, the parameter timestamp is current, but the data logger can’t read the data properly. As a result, it displays a value of -100000.0 or ‘–‘ on the dashboard.
Troubleshooting Tips
If the errors above occur, review the steps below to resolve the issue:
| Issue | Explanation | Resolution |
| Incorrect Sensor Port | During programming, the data logger stores the port the sonde was originally connected to (e.g., P0, P1, or P2).
If the sonde is later connected to a different port, the logger won’t be able to read the data correctly. |
Check the data logger for any labels or markings to identify the correct port.
If unsure, use the other available sensor ports. |
| UW-EXO needs Power Cycled | The YSI DCP adapter (built into the NexSens UW-EXO) is required for all EXO1 and EXO2 sondes.
The adapter needs to detect the sonde when it powers on. If the sonde is plugged in after power is applied, communication may not initialize correctly. Once the adapter misses the sonde at startup, it won’t try again unless the power is cycled. |
|
| Cable Issue | If a cable is left in the field without a sonde and isn’t properly protected, moisture can get in and cause corrosion.
The cable is also at risk of physical damage while the sonde is removed for servicing, if not properly protected. NOTE: Always cap and seal cables left in the field without a sonde to prevent water damage. Use a dummy plug or waterproof connector cap. |
|
| EXO Parameter Template | When programming the X-Series data logger, it reads the parameter list and SDI-12 address from the EXO sonde, based on the template set in YSI KOR software.
If you change the parameter list or SDI-12 address after programming, the logger won’t be able to read the data correctly. |
NOTE: The SDI-12 address is shown in ASCII format (e.g., 48 = 0, 49 = 1, 50 = 2, etc.). NOTE: Double-check all units. If WQData LIVE is set to convert units (like meters to feet), make sure the EXO is set to the original units before conversion.
|
| Sonde outputting all zeroes | The sonde is providing data, but all measurements read zero. This usually indicates a short in the connected cable or within the sonde, often caused by moisture intrusion on the port probes or elsewhere. A short disrupts normal data collection, resulting in zero values. A common sign of this issue is the wiper parking in the wrong position. | Review the YSI EXO User Manual for proper removal, inspection, cleaning, and reinstallation of the sensor port probes. If this does not resolve the issue, follow the Cable Issue step above.
If the problem persists, contact YSI or NexSens for further assistance. |
| Depleted Internal Batteries | EXO sondes can run on D-cell batteries. However, if the batteries are low or dead, the sonde may keep resetting, which can interrupt communication with the data logger. | Remove or replenish the batteries. |
In the example below, the sonde’s SDI-12 address is 0, which appears as 48 (ASCII format). The third column shows the original units (e.g., meters), while the dashboard displays feet (ft) because of the conversion factor set in the fourth column. Always use the third column to identify the original units when configuring the EXO parameter template.

Figure 3: Example parameter settings for YSI EXO sondes.
Setting Parameter Output for 6-Series Sondes
For YSI 6-series sondes, use EcoWatch Software or a 650MDS Multi-Parameter Display to ensure that the enabled parameters match the parameters and units previously recorded.
Establish Connection
- If using EcoWatch, connect the sonde to the PC with the appropriate interface cable. Go to Comm | Terminal and select the appropriate COM port. When the terminal opens, hit Enter or wait until the ‘#’ sign is displayed. Then type ‘menu’ and hit Enter to access the sonde menu.
- If using a 650MDS, connect the sonde with a field cable, power on the 650MDS and click Sonde menu.
Set Output
- Go to Sensors and confirm which sensors are enabled on the sonde. When finished, hit 0 (EcoWatch) or Esc (650MDS) to return to the sonde main menu.
- Go to Report and confirm that the correct parameters are enabled. Also, verify that the units match those on WQData LIVE.
- Go to System and ensure the SDI-12 address of the sonde matches WQData LIVE.
- Exit the sonde menu and disconnect the sonde.
For more information on this process, review pages 2-27 to 2-31 of the YSI 6-Series Manual.