Gill MaxiMet Weather Station X-Series Integration Guide
Real-Time Weather Measurements
The Gill MaxiMet GMX600 Weather Station measures a host of atmospheric and environmental parameters. The sensor is compatible with NexSens X-Series data loggers via the Modbus-RTU communication protocol and the RS-232 sensor interface. A pre-defined script on NexSens X-Series data loggers is able to detect, log, and transmit all parameters output by the weather station. Parameter data is transmitted, in real-time, at a user-specified interval (e.g., 10 minutes) to the NexSens WQData LIVE Web Datacenter. There, data is stored on customizable dashboards with statistics and graphical interfaces for each parameter. Users can download and send data reports via Email, FTP, or an API. Below is information on the settings and wiring required to integrate these sensors with a NexSens X-Series data logger.

Figure 1: MaxiMet GMX600 Weather Station integration with NexSens X-Series data loggers.
Compatible Models
The Gill MaxiMet weather stations measure temperature, humidity, barometric pressure, wind, and precipitation parameters outlined by international standards.
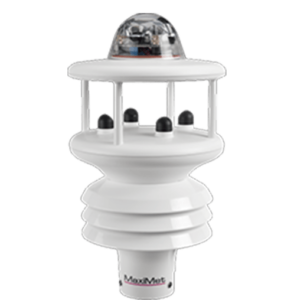
Figure 2: Gill MaxiMet GMX600 Weather Station.
Gill GMX600 Integration
Sensor settings must be adjusted using the MetSet software to output the correct parameters and insert proper configuration settings, such as elevation and local declination.
1. Configure Communication
- Download the MetSet software from the Gill Instruments website and connect the weather station using a USB configuration cable.
- Open the MetSet software and click Connect and Read.
- The software will begin searching through all available COM ports for a connection to the weather station.
- Once connected, a summary of the device settings should appear in a separate window. Close this window to begin adjusting the internal settings.
- Comms settings below are usually default and must be set as shown for proper communication with the X2 data logger:
- Protocol: GILL
- Interface: RS232
- Baud Rate: 19200
- Node ID: Q
- Output rate: 1Hz
- Message Mode: CONT
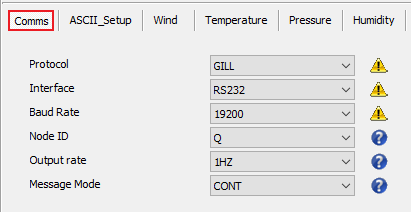
Figure 3: MaxiMet Comms settings.
2. Change Parameter Output and Internal Settings
- Once the Comms settings are confirmed, go to Reporting to set the parameter list below:
- Air Temperature (TEMP)
- Relative Barometric Pressure (PRESS)
- Absolute Humidity (AH)
- Relative Humidity (RH)
- Air Density (AIRDENS)
- Wind Speed (SPEED)
- Gust Speed (GSPEED)
- Wind Direction (CDIR)
- Rain Intensity (PRECIPI)
- Total Rain (PRECIPT)

Figure 4: MaxiMet parameter settings.
- Since atmospheric pressure varies with height above sea level, the altitude at the final deployment location must be set. The sensor will make a correction based on the set altitude to adjust the reading as if the station were at sea level.
- The example below shows a sensor that is 259 meters above sea level (elevation at ground level), while mounted 3 meters above the ground.
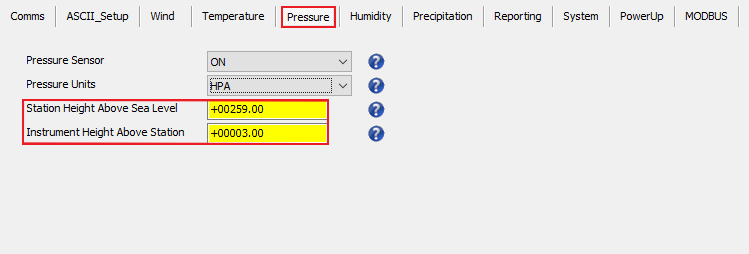
Figure 5: Station height set within pressure settings.
- If the coordinates for the final deployment location are known, it is best to set the magnetic declination within the Wind tab to correct for the Earth’s magnetic field offset from true North.
- A declination of +9.2° is set in the example below. A positive value indicates that magnetic North is East of true North and a negative value indicates a magnetic North that is West of true North.
- Magnetic declination can be calculated using the NOAA Geomagnetic Declination Calculator.
- A declination of +9.2° is set in the example below. A positive value indicates that magnetic North is East of true North and a negative value indicates a magnetic North that is West of true North.
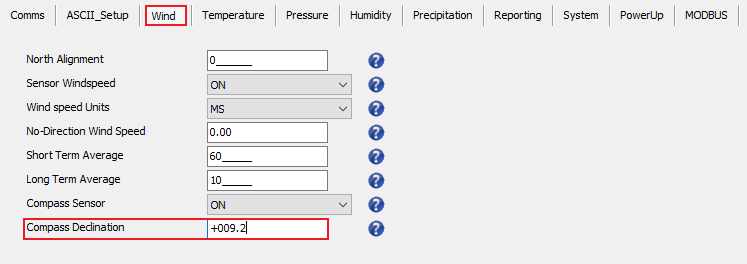
Figure 6: Magnetic declination setting for wind direction parameter.
- After making all of the necessary changes, click Save Settings To Device and wait for the weather station to successfully update the internal settings.
- The weather station is now ready for a detection on an X2 data logger. Follow the X2 data logger quick start guide or refer to the X2 Sensor Detection article for more information.
3. Automatic Sensor Detection
After setting the parameter order and adjusting the internal settings, the weather station can be programmed onto the logger via automatic detection.
X-Series Logger Detection and Script Information
The X-Series data loggers include a pre-loaded MaxiMet GMX600 script. Use the CONNECT software to enable the script for sensor detection.
| X2 Script Number | Communication Protocol | Baud Rate | Power Type | Warmup Period (sec) | Frame |
| 3008 | RS-232 | 19200 | Continuous | 15 | N81 |
Read Sensor Configuration – Confirm Sensor Detection
After ~5-10 minutes, read the sensor configuration to confirm the weather station and other sensors have been detected on the data logger. Thoroughly review the parameter list to ensure all parameters are accounted for and are measured in the desired units. Let the unit gather a few readings to confirm accurate and reasonable parameter data.
Script Parameters
The X2 reads the NMEA output string from the Gill MaxiMet that is continuously outputting the parameters below.
| NMEA 0183 Message | Description | Parameters | Units |
| $WIMWV | NMEA 0183 standard wind speed and direction. True wind direction measurement with internal compass. | Wind Direction | Degree |
| Wind Speed | m/s | ||
| Wind Gust | m/s | ||
| $WIXDR | NMEA 0183 Transducer Measurements. | Air Temperature | C |
| Relative Barometric Pressure | hPa | ||
| Absolute Humidity | g/m3 | ||
| Relative Humidity | % | ||
| Air Density | kg/m3 | ||
| Rain Intensity | mm/hr | ||
| Total Rain | mm |
4. Setting up WQData LIVE
Once an X-Series data logger has finished a new sensor detection, it will automatically push the sensor configuration to the WQData LIVE web data center. Follow the three articles below to create a WQData LIVE account and a project/site. Then add the data logger to the project using the included claim code.
- Create a WQData LIVE Account
- Create a Project on WQData LIVE
- Add a Data Logger to a Project on WQData LIVE
Real-Time System Application
Real-time weather and atmospheric measurements from the Gill GMX600 Weather Station are useful in various environmental monitoring applications.
Applicable Systems
Discover applicable uses for the Gill GMX600 Weather Station.
- Dock Monitoring Systems
- Green Roof Monitoring Systems
- Inland Lake Monitoring Systems
- Large Lake Monitoring Systems
- Weather Station Systems
Weather and Atmospheric Measurements
Learn more about weather and atmospheric measurements on the NexSens Blog Page.